Responsive Cubit News App With Multi-language
Introduction
In this article, we will create a responsive news application supporting three languages: Spanish, English, and Chinese. Additionally, we will implement a scalable architecture and add unit tests and widget tests. The application will display the latest headlines and provide the option to search for news of interest and select your preferred language.

Responsive news app supporting three different sizes.
You can find the source code on GitHub
Purpose of this Tutorial:
- Create a responsive app supporting small, medium, and large devices.
- Learn to use cubit as a state manager.
- Establish a simple, scalable architecture allowing for testing.
- Learn how to add unit tests and widget tests to our project.
- Make REST API requests using http.
- Apply dependency injection with GetIt (not to be confused with GetX).
Prerequisites (Optional):
- Obtain an API key from https://newsapi.org/.
Application Architecture
Defining an architecture is crucial when creating an application as it offers many benefits, such as:
-
Maintainability: A solid architecture facilitates error detection and correction, as well as the addition of new updates and features.
-
Team Collaboration: A well-defined architecture guides developers, reducing conflicts as everyone understands the project's structure.
-
Code Quality: With architecture, we can define standards and best practices that the entire team must follow, ensuring consistency and quality in the project.
-
Code Reusability: A good architecture helps abstract code sections that can be reused in different project parts.
-
Testable Code: A good architecture allows us to separate different application parts into sections with specific responsibilities, making it easier to test each section in isolation without depending on others.
There are many other important reasons for having an architecture, but that can be an article of its own. In a few words, defining an architecture helps us create maintainable, scalable, testable code that promotes team collaboration.
The architecture of this project is very similar to what can be found in the Flutter Bloc documentation.

Architecture: data sources, repositories, business logic, and presentation layer.
As seen in the image above, the architecture is divided into three parts: external data sources, the data layer, and the application layer. What is the responsibility of each?
-
External Data Sources: Refer to the different sources from which an application can obtain information, such as a database, web APIs, local files, device sensors, etc.
-
Data Layer: Manages interactions with data sources and allows other parts of the application to access data in an organized and secure manner. This layer is further divided into:
-
Data Sources: Connect directly with external data sources.
-
Repositories: Act as intermediaries between the data and application layers. They manage data coming from the data source, transform it, and save it in the cache or local database, among other functions.
-
-
Application Layer: Handles business logic and direct user interaction. It is divided into two parts:
-
Business Logic: Our blocs and cubits are located here. It is where we write about business logic and manage our widgets' state.
-
Presentation Layer: This is where all our widgets are located and is responsible for interactions and what the user can see: buttons, images, text, etc.
-
In this article, we will not address the dotted part, which involves connecting to a local database to store news and accessing it when offline.
External Data Source
News API
In our application, the external data source is News API, and two APIs are of interest:
-
/v2/everything: This API searches through millions of articles and will be used when the user enters text in the search bar.
-
/v2/top-headlines: This API provides top news and headlines for a country and will be used on the homepage.
In the documentation, we can see that when calling either of these two APIs, a successful response returns a JSON like this:
{
  "status": "ok",
  "totalResults": 1,
  "articles": [
    {
      "source": {
        "id": "cbs-news",
        "name": "CBS News"
      },
      "author": "Sophie Lewis",
      "title": "\"Bachelor\" host Chris Harrison is temporarily \"stepping aside\" after \"excusing historical racism\" - CBS News",
      "description": "\"By excusing historical racism, I defended it,\" Harrison wrote, announcing he will not host the \"After the Final Rose\" live special.",
      "url": "https://www.cbsnews.com/news/chris-harrison-the-bachelor-stepping-aside-comments-rachel-lindsay-backlash/",
      "urlToImage": "https://cbsnews1.cbsistatic.com/hub/i/r/2021/02/12/0cf2794b-2b04-4ced-84ce-1d72e26ed2cb/thumbnail/1200x630/8d464cc0fdf23566bbea2e01c41401ab/gettyimages-1204035255.jpg",
      "publishedAt": "2021-02-14T12:18:00Z",
      "content": "Chris Harrison, the longtime host of \"The Bachelor\" and \"The Bachelorette,\" announced Saturday that he is \"stepping aside\" from the franchise for an undisclosed \"period of time.\" The bombshell announ… [+7754 chars]"
    }
  ]
}
However, when the request is not successful, the response contains an error code (see here), and the JSON looks like this:
{
  "status": "error",
  "code": "apiKeyMissing",
  "message": "Your API key is missing. Append this to the URL with the apiKey param, or use the x-api-key HTTP header."
}
Analyzing both responses, we will need two classes to model the response. The first class, let's call it Article,
represents everything inside the articles list:
()
class Article extends Equatable {
final String title;
final String? author;
final String? description;
final String? urlToImage;
final String? content;
final String url;
const Article({
required this.title,
required this.url,
this.author,
this.content,
this.urlToImage,
this.description,
});
factory Article.fromJson(Map<String, dynamic> json) =>
_$ArticleFromJson(json);
Map<String, dynamic> toJson() => _$ArticleToJson(this);
List<Object?> get props =>
[title, author, description, urlToImage, content, url];
}
We're using the following packages in the Article class:
- Equatable: It simplifies comparing two objects of the same class without overriding
==andhashCode. You can learn more in this article. - JsonSerializable: It generates code to convert JSON to objects of the
Articleclass.
The second class represents the values of the response, either successful or unsuccessful. We're also using the Equatable and JsonSerializable packages:
()
class ApiResponse extends Equatable {
final String status;
final String? code;
final List<Article>? articles;
const ApiResponse(
this.status,
this.code,
this.articles,
);
factory ApiResponse.fromJson(Map<String, dynamic> json) =>
_$ApiResponseFromJson(json);
Map<String, dynamic> toJson() => _$ApiResponseToJson(this);
List<Object?> get props => [status, code, articles];
}
Now that we've defined the classes to help represent JSON as Dart objects, we can proceed with the class responsible for making API requests.
Execute the command to generate the necessary code for
the JsonSerializable
package: flutter pub run build_runner watch --delete-conflicting-outputs
Data Layer: Data source
As mentioned, this layer interacts with data sources, whether an external API or a local database. It also allows other parts of the application to access data in an organized and secure manner. It is divided into data sources and repositories.
NewsDataSource
The NewsDataSource class will be responsible for making requests to the News APIs. We will use
the http package, which allows us to make HTTP requests. Let's create the NewsDataSource class and
initialize some variables:
class NewsDataSource {

  // Visit https://newsapi.org/ to obtain your API key
  static const String apiKey = 'xxxxxxxxxxxxxxxxxxxxxxxxx';

  static const String baseUrl = 'newsapi.org';
  static const String everything = '/v2/everything';
  static const String topHeadlines = '/v2/top-headlines';

  final Client _httpClient;

  NewsDataSource({Client? httpClient}) : _httpClient = httpClient ?? Client();
}
We have added the base URL of News API and the paths for the two APIs we will use. We also have
the API KEY, which we can obtain on the News API website. Finally, we have a Client object that
will handle making requests to the APIs.
You might wonder why we are initializing the client as follows:
  final Client _httpClient;

  NewsDataSource({Client? httpClient}) : _httpClient = httpClient ?? Client();
Instead of doing it like this:
  final Client _httpClient = Client();

  NewsDataSource();
The answer is straightforward. Passing Client in the constructor allows us to pass a Mock to perform unit tests
on the NewsDataSource class.
Now, let's create a helper function responsible for making requests to the APIs and returning an object of
type ApiResponse with the response:
  Future<ApiResponse> _callGetApi({
    required String endpoint,
    required Map<String, String> params,
  }) async {

    // Create the URI for making a request to the API
    final uri = Uri.https(baseUrl, endpoint, params);
    final response = await _httpClient.get(uri);

    // Use `json.decode` to convert the response body to a Json object
    final result = ApiResponse.fromJson(json.decode(response.body));

    // If the response contains an error, throw an exception
    if (result.status == 'error') {
      if (result.code == 'apiKeyMissing') throw MissingApiKeyException();
      if (result.code == 'apiKeyInvalid') throw ApiKeyInvalidException();
      throw Exception();
    }

    // If there is no error, return the API result
    return result;
  }

// Define some custom exceptions that we can handle in the application layer
class MissingApiKeyException implements Exception {}
class ApiKeyInvalidException implements Exception {}
The _callGetApi function will be called whenever we make a request to either of the APIs. The error codes are
in the News API documentation. For this example, we only create
exceptions for apiKeyMissing and apiKeyInvalid.
Now, let's create two functions that will help us call the APIs we are interested in:
  // Make a request to /v2/top-headline. Receive the country
  Future<List<Article>> fetchTopHeadlines({
    required String country,
  }) async {
    final params = {
      'apiKey': apiKey,
      'country': country,
    };

    final result = await _callGetApi(
      endpoint: topHeadlines,
      params: params,
    );
    return result.articles!;
  }

  // Make a request to /v2/everything. Receive the language and a search text
  Future<List<Article>> fetchEverything({
    required String language,
    String? search,
  }) async {
    final params = {
      'apiKey': apiKey,
      'language': language,
    };

    if (search != null) params['q'] = search;

    final result = await _callGetApi(
      endpoint: everything,
      params: params,
    );
    return result.articles!;
  }
We have created two functions, fetchTopHeadlines and fetchEverything, each with its respective parameters. Each
function constructs the params parameters according to each API's requirements.
We have completed all the functions, variables, etc., that comprise the NewsDataSource class. Putting it all
together, the code is:
class MissingApiKeyException implements Exception {}
class ApiKeyInvalidException implements Exception {}

class NewsDataSource {
  // Visit https://newsapi.org/ to obtain your API key
  static const String apiKey = 'xxxxxxxxxxxxxxxxxxxxxxxxx';

  static const String baseUrl = 'newsapi.org';
  static const String everything = '/v2/everything';
  static const String topHeadlines = '/v2/top-headlines';

  final Client _httpClient;

  NewsDataSource({Client? httpClient}) : _httpClient = httpClient ?? Client();

  Future<List<Article>> fetchTopHeadlines({
    required String country,
  }) async {
    final params = {
      'apiKey': apiKey,
      'country': country,
    };

    final result = await _callGetApi(
      endpoint: topHeadlines,
      params: params,
    );
    return result.articles!;
  }

  Future<List<Article>> fetchEverything({
    required String language,
    String? search,
  }) async {
    final params = {
      'apiKey': apiKey,
      'language': language,
    };

    if (search != null) params['q'] = search;

    final result = await _callGetApi(
      endpoint: everything,
      params: params,
    );
    return result.articles!;
  }

  Future<ApiResponse> _callGetApi({
    required String endpoint,
    required Map<String, String> params,
  }) async {
    final uri = Uri.https(baseUrl, endpoint, params);

    final response = await _httpClient.get(uri);
    final result = ApiResponse.fromJson(json.decode(response.body));

    if (result.status == 'error') {
      if (result.code == 'apiKeyMissing') throw MissingApiKeyException();
      if (result.code == 'apiKeyInvalid') throw ApiKeyInvalidException();
      throw Exception();
    }

    return result;
  }
}
Testing NewsDataSource
Now let's perform tests on the NewsDataSource class. To do this, we will use the Mockito package,
which allows us to create "mocks" and simulate successful and failed requests to the APIs.
We will create three .json files that will contain simulated responses from the API. The first file contains a
failed response with the error apiKeyInvalid. With this file, we will test if the ApiKeyInvalidException exception is thrown correctly:
{
  "status": "error",
  "code": "apiKeyInvalid",
  "message": "Your API key is invalid or incorrect. Check your key, or go to https://newsapi.org to create a free API key."
}
The second file contains the error apiKeyMissing, and with it, we will test if the MissingApiKeyException
exception is thrown correctly:
{
  "status": "error",
  "code": "apiKeyMissing",
  "message": "Your API key is missing. Append this to the URL with the apiKey param, or use the x-api-key HTTP header."
}
The third file simulates the successful response from the API and contains two news:
{
  "status": "ok",
  "totalResults": 2,
  "articles": [
    {
      "source": {
        "id": "cbs-news",
        "name": "CBS News"
      },
      "author": "Sophie Lewis",
      "title": "\"Bachelor\" host Chris Harrison is temporarily \"stepping aside\" after \"excusing historical racism\" - CBS News",
      "description": "\"By excusing historical racism, I defended it,\" Harrison wrote, announcing he will not host the \"After the Final Rose\" live special.",
      "url": "https://www.cbsnews.com/news/chris-harrison-the-bachelor-stepping-aside-comments-rachel-lindsay-backlash/",
      "urlToImage": "https://cbsnews1.cbsistatic.com/hub/i/r/2021/02/12/0cf2794b-2b04-4ced-84ce-1d72e26ed2cb/thumbnail/1200x630/8d464cc0fdf23566bbea2e01c41401ab/gettyimages-1204035255.jpg",
      "publishedAt": "2021-02-14T12:18:00Z",
      "content": "Chris Harrison, the longtime host of \"The Bachelor\" and \"The Bachelorette,\" announced Saturday that he is \"stepping aside\" from the franchise for an undisclosed \"period of time.\" The bombshell announ… [+7754 chars]"
    },
    {
      "source": {
        "id": null,
        "name": "KOCO Oklahoma City"
      },
      "author": "KOCO Staff",
      "title": "Winter storm brings heavy snow, causing hazardous driving conditions across Oklahoma - KOCO Oklahoma City",
      "description": "A winter storm moving across Oklahoma Sunday morning is dumping heavy snow, causing hazardous driving conditions.",
      "url": "https://www.koco.com/article/winter-storm-brings-heavy-snow-causing-hazardous-driving-conditions-across-oklahoma/35500508",
      "urlToImage": "https://kubrick.htvapps.com/htv-prod-media.s3.amazonaws.com/images/poster-image-2021-02-14t060232-115-1613304161.jpg?crop=1.00xw:1.00xh;0,0&resize=1200:*",
      "publishedAt": "2021-02-14T12:17:00Z",
      "content": "OKLAHOMA CITY —A winter storm moving across Oklahoma Sunday morning is dumping heavy snow, causing hazardous driving conditions. \r\n[Check latest weather alerts in your area | Check live traffic condi… [+2381 chars]"
    }
  ]
}
Let's create a file called data_source_test.dart inside the test folder and set up the basic structure:
// Mocks that allow us to simulate successful and failed requests
class MockClient extends Mock implements Client {}
class FakeUri extends Fake implements Uri {}

// Path where the .json files are located
const mockPath = 'test/data_source_test';

void main() {
  late MockClient mockClient;
  late NewsDataSource dataSource;

  setUpAll(() {
    registerFallbackValue(FakeUri());
  });

  // setUp is called before each test.
  setUp(() {
    mockClient = MockClient();

    // Create a NewsDataSource object and pass the mockClient
    dataSource = NewsDataSource(httpClient: mockClient);
  });

  // Group the tests for the fetchEverything function
  group('When calling fetchEverything', () {
     // Here we will write the tests for this group
  });

  // Group the tests for the fetchTopHeadlines function
  group('When calling fetchTopHeadlines', () {
     // Here we will write the tests for this group
  });
}

// Helper function to read .json files as Strings.
Future<String> getMockBody(String filePath) => File(filePath).readAsString();
In this article, we will only test the fetchEverything function. Your homework is to add tests to
the fetchTopHeadlines function.
The first test we will do is to verify that calling the API is successful. Since the JSON file we created for
successful tests contains two news, we can verify that calling the fetchEverything function returns two news:
    test('The response contains two news', () async {
      // Get the JSON string with the successful response
      final response = await getMockBody('$mockPath/success_response.json');

      // Tell the mockClient that when it receives a GET request,
      // return the JSON with the successful response and status 200.
      when(() => mockClient.get(any())).thenAnswer((_) async {
        return Response(response, 200, headers: headers);
      });

      // Call the fetchEverything function
      final articles = await dataSource.fetchEverything(language: 'es');

      // The expected result is two news, each with a different author
      expect(articles.length, 2);
      expect(articles[0].author, 'Sophie Lewis');
      expect(articles[1].author, 'KOCO Staff');
    });
In the above test, we verify that calling the fetchEverything function returns the expected result. In the next
test, we will verify that when calling the fetchEverything function with the arguments language:'es'
and search:'Hello world', the Client receives the arguments successfully:
    test('The request contains the expected parameters', () async {
      // Get the JSON content of the successful response
      final response = await getMockBody('$mockPath/success_response.json');

      // Configure the mockClient so that, when receiving a GET request,
      // it returns the JSON of the successful response and a status 200.
      when(() => mockClient.get(any())).thenAnswer((_) async {
        return Response(response, 200, headers: headers);
      });

      // Arguments that the Client should receive
      const language = 'es';
      const searchTerm = 'Hello world';

      // Call the fetchEverything function
      await dataSource.fetchEverything(
        language: language,
        search: searchTerm,
      );

      // Create the expected Uri with the provided arguments
      final uri = Uri.https(
        NewsDataSource.baseUrl,
        NewsDataSource.everything,
        {
          'apiKey': NewsDataSource.apiKey,
          'language': language,
          'q': searchTerm,
        },
      );

      // Verify that the Client was called with the expected Uri
      verify(() => mockClient.get(uri)).called(1);
    });
Let's create the test where the response is unsuccessful, and the function throws the MissingApiKeyException exception:
    test('Correctly throws Missing API Key Exception for non-successful response', () async {
      // Obtain the JSON content of the failed response
      final response = await getMockBody('$mockPath/api_key_missing.json');

      // Configure the mockClient so that, upon receiving a GET request,
      // it returns the JSON of the failed response and a status code of 200.
      when(() => mockClient.get(any())).thenAnswer((_) async {
        return Response(response, 200);
      });

      // When calling the fetchEverything function, we expect the
      // MissingApiKeyException exception to be thrown
      expect(
          () => dataSource.fetchEverything(language: 'es'),
          throwsA(
              predicate((exception) => exception is MissingApiKeyException)));
    });
And finally, the test where the response is unsuccessful, and the function throws the ApiKeyInvalidException exception:
    test('Correctly throws Invalid API Key Exception for non-successful response', () async {
      // Obtain the JSON content of the failed response
      final response = await getMockBody('$mockPath/api_key_invalid.json');

      // Configure the mockClient so that, upon receiving a GET request,
      // it returns the JSON of the failed response and a status code of 200.
      when(() => mockClient.get(any())).thenAnswer((_) async {
        return Response(response, 200);
      });

      // When calling the fetchEverything function, we expect the
      // ApiKeyInvalidException exception to be thrown
      expect(
          () => dataSource.fetchEverything(language: 'es'),
          throwsA(
              predicate((exception) => exception is ApiKeyInvalidException)));
    });
Dependency Injection
GetIt
GetIt is a service locator package that helps us adhere to the Dependency Inversion Principle, which aims to reduce coupling between software components and promote flexibility and ease of maintenance.
Let's create a new file called dependency_injection.dart, where we will initialize GetIt and create a
helper function to inject NewsDataSource:
final getIt = GetIt.instance;

Future<void> injectDependencies() async {
  getIt.registerLazySingleton(() => NewsDataSource());
}
Then, in the main() function, we call injectDependencies() to register the dependencies:
void main() async {

  // Inject dependencies when starting the application
  injectDependencies();

  runApp(const MyApp());
}
Why should we use dependency injection in our application? Later, when we write unit tests, we can create a
"Mock" class, for example, MockNewsDataSource, and inject it into the tests, allowing us to simulate different scenarios.
Data Layer: Repository
NewsRepository
In this small application, the repository is merely an intermediary between the data sources and the cubits.
Remember that, in larger applications, the repository has several uses, such as managing data coming from the data source, transforming it, and saving it to the cache or local database, etc.
We create the NewsRepository class with the fetchEverything and fetchTopHeadlines functions that call the
data source to retrieve the data:
class NewsRepository {
  // Get the data source we injected earlier
  final NewsDataSource _dataSource = getIt();

  // Call the data source to get all news
  Future<List<Article>> fetchEverything({
    required Locale locale,
    String? search,
  }) =>
      _dataSource.fetchEverything(
        language: locale.languageCode,
        search: search,
      );

  // Call the data source to get the latest headlines
  Future<List<Article>> fetchTopHeadlines({
    required Locale locale,
  }) =>
      _dataSource.fetchTopHeadlines(
        country: locale.countryCode!,
      );
}
Finally, we have finished coding the data layer, where we created the NewsDataSource class acting as the gateway
to our external data sources and established a robust set of tests to ensure its correct operation in various
situations. We also learned to use dependency injection with GetIt, providing flexibility and ease of testing.
Application Layer: Business Logic
This layer is responsible for handling business logic and direct interaction with users. It interacts directly with the data layer to obtain and store information, making it crucial for writing unit tests since most of the business logic resides here.
NewsCubit
The NewsCubit class is responsible for maintaining the user interface's state and calling the repository to
retrieve news to be displayed to the user. Before coding the cubit, let's examine the possible states
of the application:

Application States: Loading, Success, Error
-
Loading State: We show a loading animation on the user interface during this state. A request to the API is being made during this state. The
NewsLoadingStateclass represents this state. -
Success State: When the API response is successful, we enter the success state and display a news list on the user interface. The
NewsSuccessStateclass represents this state, containing the news list. -
Error State: If the API response fails, we enter the error state and display the error message on the user interface. The
NewsErrorStateclass represents this state, containing the error message.
When creating a cubit, it's necessary to indicate the type of the state. In our case, there are three
states: NewsLoadingState, NewsSuccessState, and NewsErrorState. We achieve this by using inheritance:
// All states will extend from NewsState
sealed class NewsState extends Equatable {
List<Object> get props => [];
}
// Loading state
class NewsLoadingState extends NewsState {}
// Success state
class NewsSuccessState extends NewsState {
// The list of news
final List<Article> news;
NewsSuccessState(this.news);
List<Object> get props => [news];
}
// Error state
class NewsErrorState extends NewsState {
// The error message
final String message;
NewsErrorState(this.message);
List<Object> get props => [message];
}
Now that we have defined the states, we can create the NewsCubit class:
class NewsCubit extends Cubit<NewsState> {

  // The cubit has a dependency in the repository
  final NewsRepository _repository = getIt();

  NewsCubit() : super(NewsLoadingState());
}
To complete the implementation of the NewsCubit, we need to understand the types of interactions the user can have
with the application. The following image illustrates these interactions:
Places where the user can interact with the application
There are three places where the user can interact with the application:
- Search Bar: The user can enter text to search for news of interest.
- Language Selection: Let the user change the application's language.
- Clear Button: Clears the content of the search bar and displays the latest news in the application.
Now we can create three functions in our cubit to handle the search, language change, and clear button events:
class NewsCubit extends Cubit<NewsState> {
  final NewsRepository _repository = getIt();

  // Helper variable containing the text we are searching for
  String? _currentSearch;

  // Helper variable containing the language and country of the news we are searching for
  Locale _currentLocale;

  // Initialize "locale" in the constructor
  NewsCubit(Locale locale)
      : _currentLocale = locale,
        super(NewsLoadingState());

  // When the user enters a search term, we call this function
  Future<void> searchNews({
    String? search,
  }) async {
    _currentSearch = search;
    return _search();
  }

  // When the user presses the clear button, we call this function
  Future<void> clearSearch() async {
    _currentSearch = null;
    return _search();
  }

  // When the user changes the language of the application, we call this function
  Future<void> setLocale(Locale newLocale) async {
    if (_currentLocale == newLocale) return;
    _currentLocale = newLocale;
    return _search();
  }

  // This function abstracts the search logic to avoid code repetition in the [searchNews], [clearSearch], and [setLocale] functions
  Future<void> _search() async {

  }
}
We have already created the three necessary functions for the presentation layer to send user-generated events
to the NewsCubit. We can also see that the three functions share the search logic, which we are going to
implement in the private function _search():
Future<void> _search() async {
  // The code is within a try-catch block to catch
  // exceptions thrown from the data layer
  try {

    // Emit the loading state to have the presentation layer display the loading interface
    emit(NewsLoadingState());

    // Using a switch, if [_currentSearch] is null, call the API for the latest headlines
    // but if it is not null, call the API to search for all news
    final news = await switch (_currentSearch) {
      null => _repository.fetchTopHeadlines(
          locale: _currentLocale,
        ),
      _ => _repository.fetchEverything(
          locale: _currentLocale,
          search: _currentSearch,
        )
    };

    // Emit the success state with the list of news for the presentation layer to display the news
    emit(NewsSuccessState(news));

  } on Exception catch (e) {

    // In case of any exception, catch it and emit an error state for the presentation
    // layer to display the error
    if (e is MissingApiKeyException) {
      emit(NewsErrorState('Please check the API key'));
    } else if (e is ApiKeyInvalidException) {
      emit(NewsErrorState('The API key is not valid'));
    } else {
      emit(NewsErrorState('Unknown error'));
    }
  }
}
We have completed all the functions, variables, etc., that comprise the NewsCubit class. If we put everything
together, the code will be:
class NewsCubit extends Cubit<NewsState> {
  final NewsRepository _repository = getIt();
  String? _currentSearch;
  Locale _currentLocale;

  NewsCubit(Locale locale)
      : _currentLocale = locale,
        super(NewsLoadingState());

  Future<void> searchNews({
    String? search,
  }) async {
    _currentSearch = search;
    return _search();
  }

  Future<void> clearSearch() async {
    _currentSearch = null;
    return _search();
  }

  Future<void> setLocale(Locale newLocale) async {
    if (_currentLocale == newLocale) return;
    _currentLocale = newLocale;
    return _search();
  }

  Future<void> _search() async {
    try {
      emit(NewsLoadingState());

      final news = await switch (_currentSearch) {
        null => _repository.fetchTopHeadlines(
            locale: _currentLocale,
          ),
        _ => _repository.fetchEverything(
            locale: _currentLocale,
            search: _currentSearch,
          )
      };

      emit(NewsSuccessState(news));

    } on Exception catch (e) {

      if (e is MissingApiKeyException) {
        emit(NewsErrorState('Please check the API key'));
      } else if (e is ApiKeyInvalidException) {
        emit(NewsErrorState('The api key is not valid'));
      } else {
        emit(NewsErrorState('Unknown error'));
      }
    }
  }
}
Testing NewsCubit
It's time to test that the NewsCubit class works as expected. To test a cubit, we can use the bloc_test
package, which makes testing cubits and blocs easier. Let's create a file called news_cubit_test.dart inside the
test folder and set up the basic structure:
// Mock will allow us to return mock data to the cubit from the repository
class MockNewsRepository extends Mock implements NewsRepository {}

// Mock Locale that we will use to pass to the cubit in the constructor and the setLocale function
const mockLocale = Locale('en', 'US');

// Calling the fetchTopHeadlines function will return this article
const mockTopArticle = Article(title: "TopArticle", url: "someUrl");

// Calling the fetchEverything function will return this article
const mockEverythingArticle = Article(title: "Everything", url: "someUrl");

void main() {
  late MockNewsRepository mockRepo;

  // setUp is called before each test.
  setUp(() async {
    mockRepo = MockNewsRepository();

    // Injecting MockNewsRepository
    getIt.registerSingleton<NewsRepository>(mockRepo);
  });

  // tearDown is called after each test.
  tearDown(() async {
    // Resetting getIt to its initial state
    await getIt.reset();
  });
}
Now, we need to configure MockNewsRepository so that the fetchTopHeadlines and fetchEverything functions return
an article when called:
setUp(() async {
  mockRepo = MockNewsRepository();
  getIt.registerSingleton<NewsRepository>(mockRepo);

  // When the fetchEverything function is called with mockLocale and any
  // search term, it returns a list containing the mockEverythingArticle
  when(() => mockRepo.fetchEverything(
        locale: mockLocale,
        search: any(named: 'search'),
      )).thenAnswer((_) async => [mockEverythingArticle]);

  // When the fetchTopHeadlines function is called with mockLocale
  // it returns a list containing the mockTopArticle
  when(() => mockRepo.fetchTopHeadlines(locale: mockLocale))
      .thenAnswer((_) async => [mockTopArticle]);
});
The first test we're going to perform is to verify that calling the searchNews function emits the correct states
and calls the fetchTopHeadlines function correctly:
blocTest<NewsCubit, NewsState>(
  'When the search term is null '
  'fetchTopHeadlines will be called '
  'and the state will contain the mockTopArticle',

  // Create the cubit with mockLocale
  build: () => NewsCubit(mockLocale),

  // Call the searchNews function
  act: (cubit) async => cubit.searchNews(),

  // States should be emitted in the correct order
  expect: () => [
    NewsLoadingState(),
    NewsSuccessState(const [mockTopArticle]),
  ],

  // Verify that the fetchTopHeadlines function was called 1 time with the
  // argument mockLocale
  verify: (cubit) {
    verify(() => mockRepo.fetchTopHeadlines(locale: mockLocale)).called(1);
  }
);
In the second test, we'll pass a search text to the searchNews function. Therefore, the fetchEverything function
should be called, and the states should be emitted correctly:
blocTest<NewsCubit, NewsState>(
  'When the search term is not null '
  'fetchEverything will be called '
  'and the state will contain the mockEverythingArticle',

  // Create the Cubit with mockLocale
  build: () => NewsCubit(mockLocale),

  // Call the searchNews function with a search text
  act: (cubit) async => cubit.searchNews(search: 'Hello world'),

  // States should be emitted in the correct order
  expect: () => [
    NewsLoadingState(),
    NewsSuccessState(const [mockEverythingArticle]),
  ],

  // Verify that the fetchEverything function was called 1 time with the
  // arguments mockLocale and 'Hello world'
  verify: (cubit) {
    verify(
      () => mockRepo.fetchEverything(
        locale: mockLocale,
        search: 'Hello world',
      ),
    ).called(1);
  }
);
For the third test, we'll call the searchNews function with a search text and then call the clearSearch function.
We need to verify that the fetchEverything and fetchTopHeadlines functions are called correctly and that
the NewsCubit states are emitted correctly:
blocTest<NewsCubit, NewsState>(
  'When the search term is not null '
  'fetchEverything will be called '
  'and then clearing the search will trigger a new search '
  'then fetchTopHeadlines will be called '
  'and states will be emitted correctly',

  // Create the Cubit with mockLocale
  build: () => NewsCubit(mockLocale),

  // Call the searchNews function with a search text
  // and then call the clearSearch function
  act: (cubit) async {
    await cubit.searchNews(search: 'Hello world');
    await cubit.clearSearch();
  },

  // States should be emitted in the correct order
  expect: () => [
    NewsLoadingState(),
    NewsSuccessState(const [mockEverythingArticle]),
    NewsLoadingState(),
    NewsSuccessState(const [mockTopArticle]),
  ],

  // Verify that the fetchEverything and fetchTopHeadlines functions
  // were called 1 time with the correct arguments
  verify: (cubit) {
    verify(
      () => mockRepo.fetchEverything(
        locale: mockLocale,
        search: 'Hello world',
      ),
    ).called(1);
    verify(() => mockRepo.fetchTopHeadlines(locale: mockLocale)).called(1);
  }
);
Finally, let's add one more test. In this test, we want to verify that the error state is emitted correctly if the repository throws an exception:
blocTest<NewsCubit, NewsState>(
  'When the Api key is not valid exception is handled correctly',

  build: () {
    // Configure mockRepo to throw an ApiKeyInvalidException
    // when the fetchTopHeadlines function is called
    when(() => mockRepo.fetchTopHeadlines(locale: mockLocale))
        .thenAnswer((_) async => throw ApiKeyInvalidException());

    // Create the cubit with mockLocale
    return NewsCubit(mockLocale);
  },
  // Call the searchNews function
  act: (cubit) async => cubit.searchNews(),

  // States should be emitted in the correct order and
  // the last state is the error state
  expect: () => [
    NewsLoadingState(),
    NewsErrorState('The API key is not valid'),
  ],
);
Great! We have completed the NewsCubit class, which will be responsible for maintaining the application's state.
We have also added tests to ensure it works as expected.
Presentation Layer: User Interface
The user interface
As mentioned, the presentation layer handles interactions and what the user can see: buttons, images, text, etc.
We need to create an application with support for three different screen sizes:

Responsive app with support for three sizes.
Desktop View
Let's begin with the largest screen size designed for a desktop computer. We'll break down the user interface into different parts:

We can identify three main parts:
-
Search Bar: Users can enter text to search for news of interest.
-
News List: Comprising several news articles; clicking on any reveals the news details.
-
News Details: Users can view news details, and clicking "Read More" opens the browser to the news page.
While each of these parts can be further broken down, let's focus on these three. For the search bar, we'll create a
widget called SearchWidget. For news details, we'll create a widget named DetailsWidget, and for each article in
the news list, the widget will be called ListItem.
Let's start by creating the SearchWidget:
// Using Flutter Hooks instead of a StatefulWidget.
class SearchWidget extends HookWidget {
const SearchWidget({
Key? key,
required this.onChanged,
required this.onClearPress,
});
// Callback is executed when the clear button is pressed in the search bar.
final VoidCallback onClearPress;
// Callback executed each time the search term changes.
final ValueChanged<String> onChanged;
Widget build(BuildContext context) {
// Create a TextEditingController with Flutter Hooks.
final controller = useTextEditingController();
// State that helps us show or hide the clear button
// based on whether there is text in the search bar or not.
final searchTermEmpty = useState(controller.text.isEmpty);
return Padding(
padding: const EdgeInsets.all(8.0),
child: TextFormField(
controller: controller,
onChanged: (text) {
// Delay the call to "onChanged" to avoid multiple API calls.
EasyDebounce.debounce(
'search-news',
const Duration(milliseconds: 300),
() => onChanged.call(text),
);
searchTermEmpty.value = controller.text.isEmpty;
},
decoration: InputDecoration(
prefixIcon: const Icon(Icons.search),
labelText: 'Search News',
// Hide or show the clear button based on whether there is text.
suffixIcon: searchTermEmpty.value
? null
: IconButton(
onPressed: () {
controller.clear();
onClearPress.call();
},
icon: const Icon(Icons.clear),
),
border: const OutlineInputBorder(),
),
),
);
}
}
In the SearchWidget widget, we have utilized the following packages:
- Flutter Hooks: It helps eliminate repetitive code and makes it more readable. Learn more about it in this videotutorial.
- EasyDebounce: This package prevents excessive API calls when users type in the search bar.
Now, let's proceed to create the DetailsWidget:
class DetailsWidget extends StatelessWidget {
const DetailsWidget({
Key? key,
required this.article,
});
final Article article;
Widget build(BuildContext context) {
return SizedBox(
height: double.infinity,
child: SingleChildScrollView(
child: Column(
children: [
// If the news lacks an image, display a red container;
// otherwise, use `CachedNetworkImage` to show it.
article.urlToImage == null
? Container(color: Colors.red, height: 250)
: CachedNetworkImage(
width: 450,
imageUrl: article.urlToImage!,
placeholder: (context, url) => const Center(
child: CircularProgressIndicator(),
),
errorWidget: (context, url, error) =>
const Icon(Icons.error),
),
Text(
article.title,
style: const TextStyle(fontWeight: FontWeight.bold, fontSize: 18),
),
const SizedBox(height: 8),
Text('${article.content}'),
const SizedBox(height: 8),
// Clicking the button opens the news in the browser.
ElevatedButton(
onPressed: () => launchUrlString(article.url),
child: const Text('Read More'),
),
const SizedBox(height: 16),
],
),
),
);
}
}
Now, let's create the ListItem widget:
// Constant to define the width and height of the image.
const _imageSize = 120.0;
class ListItem extends StatelessWidget {
const ListItem({
Key? key,
required this.article,
required this.onTap,
});
final Article article;
final GestureTapCallback onTap;
Widget build(BuildContext context) {
// GestureDetector helps detect if this widget has been pressed.
return GestureDetector(
onTap: onTap,
child: Card(
margin: const EdgeInsets.symmetric(horizontal: 8, vertical: 4),
child: Row(
crossAxisAlignment: CrossAxisAlignment.start,
children: [
// `_Image` is a private widget that helps show the image or
// display an empty container if the news lacks an image.
_Image(url: article.urlToImage),
Expanded(
child: Padding(
padding: const EdgeInsets.all(8.0),
child: Column(
crossAxisAlignment: CrossAxisAlignment.start,
children: [
// Display the news title.
Text(
article.title,
maxLines: 2,
overflow: TextOverflow.ellipsis,
style: const TextStyle(
fontWeight: FontWeight.bold,
fontSize: 16,
),
),
// If the news has a description, display it.
if (article.description != null) ...[
const SizedBox(height: 16),
Text(
article.description!,
maxLines: 3,
overflow: TextOverflow.ellipsis,
)
]
],
),
),
),
],
),
),
);
}
}
// `_Image` is a private widget that helps show the news image.
class _Image extends StatelessWidget {
const _Image({
required this.url,
});
final String? url;
Widget build(BuildContext context) {
// If the URL is null, display a red container.
return url == null
? Container(
width: _imageSize,
height: _imageSize,
color: Colors.red,
)
// If the URL is not null, use `CachedNetworkImage` to show the image.
: CachedNetworkImage(
width: _imageSize,
height: _imageSize,
imageUrl: url!,
fit: BoxFit.cover,
// While the image is loading, show a CircularProgressIndicator.
placeholder: (context, url) => const SizedBox(
width: _imageSize,
height: _imageSize,
child: Center(
child: CircularProgressIndicator(),
),
),
// In case of an error, display the error icon.
errorWidget: (context, url, error) => const Icon(Icons.error),
);
}
}
We have now built the three main parts: the search bar SearchWidget, the news details DetailsWidget, and
the widget representing each news item in the news list ListItem. The next step is to integrate NewsCubit with
the user interface.
Integrating NewsCubit with the User Interface
Let's create the home screen, which will be displayed when users open the application. We'll name it NewsScreen.
class NewsScreen extends StatelessWidget {
const NewsScreen({Key? key});
Widget build(BuildContext context) {
// Get the current locale of the application.
final locale = Localizations.localeOf(context);
// Use BlocProvider to create a NewsCubit and add it to the widget tree.
return BlocProvider<NewsCubit>(
// Create a NewsCubit with the current locale and call the searchNews function
// to initiate the search as soon as the NewsScreen is visible.
create: (context) => NewsCubit(locale)..searchNews(),
child: Scaffold(
appBar: AppBar(
title: Text('News App'),
),
// Use BlocBuilder to act according to the states of NewsCubit.
body: BlocBuilder<NewsCubit, NewsState>(
builder: (context, state) {
// Depending on the state, return different widgets.
return ?????;
},
),
),
);
}
}
Now, let's display the NewsScreen when the application is launched:
void main() async {
  // Inject dependencies when starting the application.
  injectDependencies();

  runApp(
    // Create a MaterialApp that displays the NewsScreen.
    const MaterialApp(
      title: 'Flutter Demo',
      home: NewsScreen(),
    ),
  );
}
Depending on the current state of the cubit, we should return a different widget in the builder function of BlocBuilder:
    BlocBuilder<NewsCubit, NewsState>(
      builder: (context, state) {
        // Use a column to align the widgets.
        return Column(
          children: [
            // The first widget is the search bar.
            SearchWidget(
              // When the text changes, if it is longer than three characters,
              // call searchNews to perform a new search.
              onChanged: (text) {
                context
                    .read<NewsCubit>()
                    .searchNews(search: text.length > 3 ? text : null);
              },
              // When the clear button is pressed, call clearSearch to perform a new search without a search term.
              onClearPress: context.read<NewsCubit>().clearSearch,
            ),
            // Then we have an "Expanded" because the content after the search bar will take up the remaining space.
            Expanded(
              // The "Builder" is unnecessary, but it helps to use "if else" more organized.
              child: Builder(
                builder: (context) {
                  if (state is NewsSuccessState) {
                    // If the state is successful, display the _BigSize widget.
                    return _BigSize(news: state.news);
                  } else if (state is NewsErrorState) {
                    // If the state is an error, display text with the error.
                    return Text(state.message);
                  } else {
                    // If the state is loading, display a loading indicator.
                    return const Center(
                      child: CircularProgressIndicator(),
                    );
                  }
                },
              ),
            ),
          ],
        );
      },
    )
We've implemented the content of the BlocBuilder, but there's a widget we haven't created yet. _BigSize is the
widget containing the large screens' user interface structure. Let's see how to implement it:
class _BigSize extends HookWidget {
// Initialize the list of news in the constructor.
const _BigSize({required this.news});
final List<Article> news;
Widget build(BuildContext context) {
// Use hooks to maintain the state of the selected news.
final currentNew = useState(news.firstOrNull);
// Use Row to separate the screen into two. The news list is on the left, and the details are on the right.
return Row(
children: [
// The news list has a fixed width of 450.
SizedBox(
width: 450,
child: ListView.builder(
itemCount: news.length,
// When pressing an item in the list, update the local state with the selected news.
itemBuilder: (_, int index) => ListItem(
article: news[index],
onTap: () => currentNew.value = news[index],
),
),
),
// Display the details of the selected news.
if (currentNew.value != null)
Expanded(
child: DetailsWidget(
article: currentNew.value!,
),
),
],
);
}
}
Now, we can run the application and see the result.

Application without phones and tablets support
The application looks good; we can select different news, but the problem is that the application does not adapt to screen changes and shows overflow errors. Let's continue by adding support for other screen sizes.
User Interface: Tablet or iPad
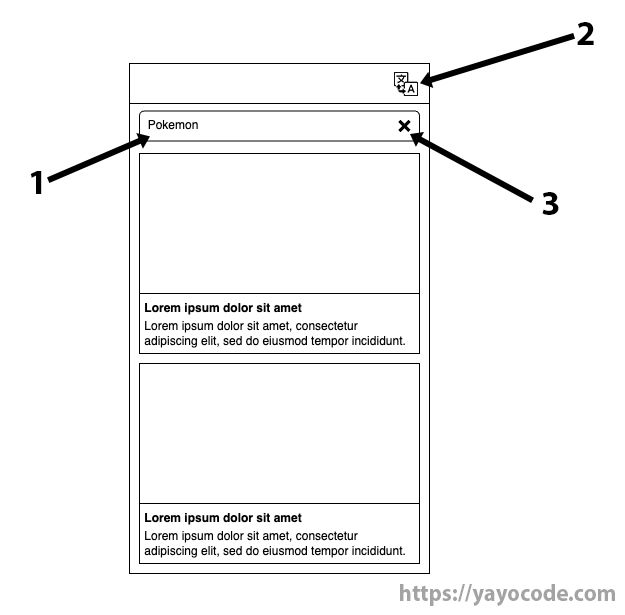
It's time to add support for tablets and iPads. In this case, the news list and details will be on separate screens, as shown in the following image:
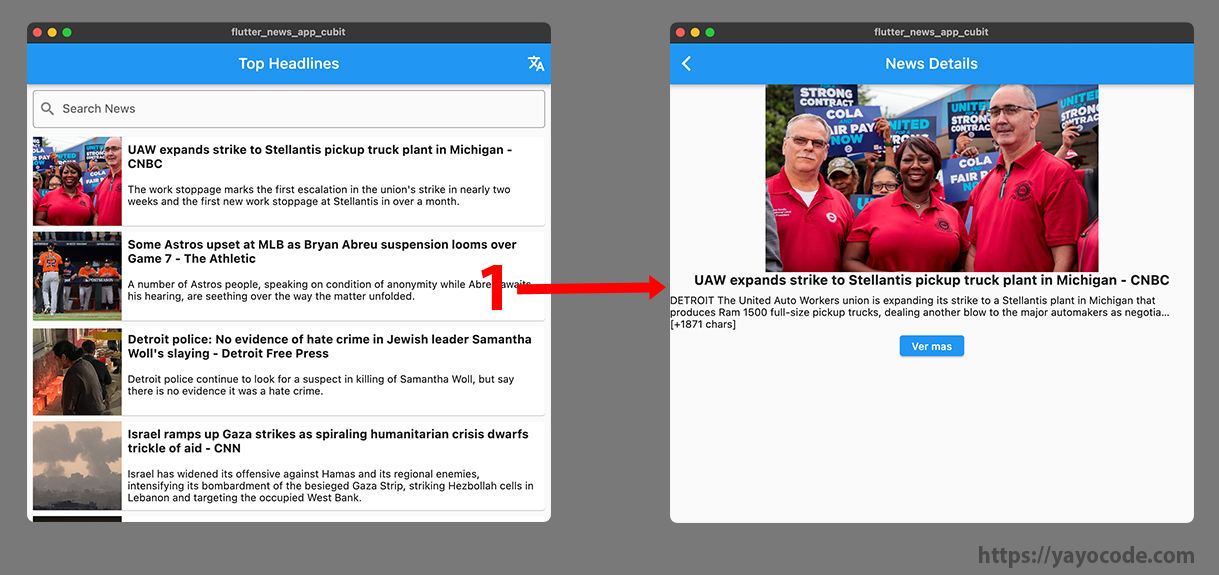
1. When pressing a news item in the list, we navigate to the news details.
Let's create a new screen called NewsDetailScreen, which will be used to view the details of the news:
// Define a type that we will use to pass the news
// as an argument during navigation.
typedef NewsDetailScreenArgs = ({Article article});
class NewsDetailScreen extends StatelessWidget {
const NewsDetailScreen({Key? key});
Widget build(BuildContext context) {
// Get the news.
final article = context.args<NewsDetailScreenArgs>().article;
// Create a Scaffold with an AppBar and use the DetailsWidget
// widget to display the news details.
return Scaffold(
appBar: AppBar(
title: const Text('News Details'),
),
body: DetailsWidget(article: article),
);
}
}
The above code shows that the NewsDetailScreen class is straightforward since we are reusing the DetailsWidget.
We will use routes for navigation, so let's create a new class called Routes that will manage the routes.
class Routes {
  // Root route
  static const newsScreen = '/';

  // News details route
  static const detailsScreen = '/details';

  static Route routes(RouteSettings settings) {

    // Helper function to create MaterialPageRoute and avoid
    // having too much repetitive code.
    MaterialPageRoute buildRoute(Widget widget) {
      return MaterialPageRoute(builder: (_) => widget, settings: settings);
    }

    // Use a switch to navigate to the desired route; if the route
    // does not exist; throw an exception.
    return switch (settings.name) {
      newsScreen => buildRoute(const NewsScreen()),
      detailsScreen => buildRoute(const NewsDetailScreen()),
      _ => throw Exception('Route does not exist'),
    };
  }
}
We must also modify MaterialApp and use onGenerateRoute instead of home.
    return MaterialApp(
      title: 'Flutter Demo',
      onGenerateRoute: Routes.routes,
    );
Great, we now have navigation ready, but we must also add support for tablets and iPads. Let's create a new private widget that will display the list on medium-sized screens:
class _MediumSize extends StatelessWidget {
// Initialize the list of news in the constructor.
const _MediumSize({required this.news});
final List<Article> news;
Widget build(BuildContext context) {
// Create the news list.
return ListView.builder(
itemCount: news.length,
itemBuilder: (_, int index) => ListItem(
article: news[index],
onTap: () {
// When pressing an item in the list, navigate to the details screen.
final args = (article: news[index]);
Navigator.pushNamed(context, Routes.detailsScreen, arguments: args);
},
),
);
}
}
Finally, to decide whether to show the _BigSize or _MediumSize widget, we will use a LayoutBuilder as follows:
    return LayoutBuilder(
      builder: (context, constraints) {
        // If the available maximum width is less than 900 units,
        // show _MediumSize; otherwise, show _BigSize.
        return switch (constraints.maxWidth) {
          < 900 => _MediumSize(news: state.news),
          _ => _BigSize(news: state.news),
        };
      },
    );
If we run the application and resize the screen, we can see that the user interface adapts correctly.
User Interface: Mobile
It's time to add support for mobile phones. But this part is a task for the reader, so let's see how the user interface looks:

1. When pressing a news item in the list, we navigate to the news details.
The user interface is very similar to the tablet interface, so it won't be complicated to create. But here are some tips:
-
Create a new widget to represent each news item in the list.
-
Create a new widget to display the news list. For consistency in the code, I would call it
_SmallSize. -
Modify the logic of the
LayoutBuilderto display the_SmallSizewidget. -
NO need to create any new screens or routes.
If you encounter any issues, remember that you can download the source code from GitHub.
Multi-language Support
Using EasyLocalization
Now, let's add support for multiple languages to the application. We will use the EasyLocalization package, simplifying adding multiple languages. Learn more about this package in this videotutorial.
First, we need to decide which languages we want to support. We can refer to the documentation of the two APIs we are going to support:
-
/v2/everything: Supports the
languageparameter with values like es, en, zh, and many more. -
/v2/top-headlines: Supports the
countryparameter with values like mx, ve, us, tw, and many more.
This application will only add support for a few languages and countries. Let's start by creating a list of supported locales:
const spanishMx = Locale('es', 'MX'); // Spanish from Mexico
const spanishVe = Locale('es', 'VE'); // Spanish from Venezuela
const englishUs = Locale('en', 'US'); // English from the USA
const chineseTw = Locale('zh', 'TW'); // Chinese from Taiwan

// Map with the names of the supported languages
final supportedLocales = <Locale, String>{
  englishUs: 'English - US',
  spanishMx: 'Español - MX',
  spanishVe: 'Español - VE',
  chineseTw: '中文 - TW',
};
We also need three JSON files with translations for the supported languages.
For English, we have en.json:
{
  "top_headlines": "Top Headlines",
  "search_news": "Search News",
  "view_more": "View more"
}
For Spanish, we have es.json:
{
  "top_headlines": "Titulares Principales",
  "search_news": "Buscar Noticias",
  "view_more": "Ver más"
}
And for Chinese, we have zh.json:
{
  "top_headlines": "最新的新聞",
  "search_news": "找新聞",
  "view_more": "看更多"
}
EasyLocalization supports code generation that creates each key in a map, making it easier to access in the code. For example:
// Without code generation, we might make mistakes like the following:
Text('top_headLines'.tr());

// Did you find the error? Instead of writing 'top_headlines', we wrote 'top_headLines'.

// But with code generation, we can't make any mistakes:
Text(LocaleKeys.top_headlines.tr())
Let's run the following command to generate all the necessary code:
flutter pub run easy_localization:generate -f keys -S resources/translations -O lib/src/localization -o locale_keys.g.dart
flutter pub run easy_localization:generate -S resources/translations -O lib/src/localization
Do not worry if you don't understand the above command. In the source code, you can find the generate_code.sh file and execute it from the terminal or console to generate all the necessary code.
After running the above command, the codegen_loader.g.dart and locale_keys.g.dart files will be generated inside
the lib/src/localization folder.
After generating the necessary code, let's initialize the EasyLocalization package. We'll
modify the main() function as follows:
void main() async {

  // Ensure the initialization of WidgetsFlutterBinding and EasyLocalization
  WidgetsFlutterBinding.ensureInitialized();
  await EasyLocalization.ensureInitialized();

  injectDependencies();
  runApp(const MyApp());
}
We also need to configure EasyLocalization and enclose our MaterialApp with
the EasyLocalization widget:
class MyApp extends StatelessWidget {
const MyApp({Key? key});
Widget build(BuildContext context) {
return EasyLocalization(
// The fallback language is English from the USA
fallbackLocale: englishUs,
useFallbackTranslations: true,
// Pass the list of supported languages
supportedLocales: supportedLocales.keys.toList(),
// path is not necessary because we are using generated code
path: 'xxx',
// Pass the generated class
assetLoader: const CodegenLoader(),
// Enclose MaterialApp with the EasyLocalization widget
child: const _MaterialApp(),
);
}
}
class _MaterialApp extends StatelessWidget {
const _MaterialApp();
Widget build(BuildContext context) {
// Configure MaterialApp to support different languages
return MaterialApp(
title: 'Flutter Demo',
locale: context.locale,
onGenerateRoute: Routes.routes,
debugShowCheckedModeBanner: false,
supportedLocales: context.supportedLocales,
localizationsDelegates: context.localizationDelegates,
);
}
}
Let's return to the NewsScreen class and make two modifications. The first modification is to use
the EasyLocalization extension to get the current locale. So, replace the following code:
// Replace this line of code
final locale = Localizations.localeOf(context);

// with
final locale = context.locale;
The difference in the above code is that using the EasyLocalization extension is much shorter.
We also need to add a PopupMenuButton that allows us to select between the languages supported by our application:

PopupMenuButton to select the language.
Let's create a widget called _LanguagePopUpMenu that will allow us to display a menu to select from the
supported languages:
class _LanguagePopUpMenu extends StatelessWidget {
Widget build(BuildContext context) {
// Create a PopupMenuButton with the translate icon
return PopupMenuButton<Locale>(
icon: const Icon(Icons.translate),
itemBuilder: (context) {
// Iterate through each of the supported languages to create
// a list of PopupMenuItem
return supportedLocales.entries.map((it) {
return PopupMenuItem(
value: it.key,
child: Text(it.value),
);
}).toList();
},
// Each time we select a language from the menu, update
// the language of the application and the cubit.
onSelected: (selected
Locale) {
context.setLocale(selectedLocale);
context.read<NewsCubit>().setLocale(selectedLocale);
},
);
}
}
Then, add it to the AppBar in the actions: property:
 // Add the _LanguagePopUpMenu widget to the AppBar
 appBar: AppBar(
   title: Text(LocaleKeys.top_headlines.tr()),
   actions: [
      _LanguagePopUpMenu(),
   ],
 ),
Now, we can run the application, and we will be able to select the language and search in any of the supported languages.
This concludes this series of articles, so remember that you can find the source code on GitHub.